Note
This page is no longer being updated.
Content may be inaccurate.
Links may be dead.
Referenced resources may be unavailable.
Commands may not work as written.
Introduction
Follow this guide to get a basic touch based GUI environment on the Aopen Chromebase Mini. It’s meant to be used as a starting point and will need further configuration to suit your needs.
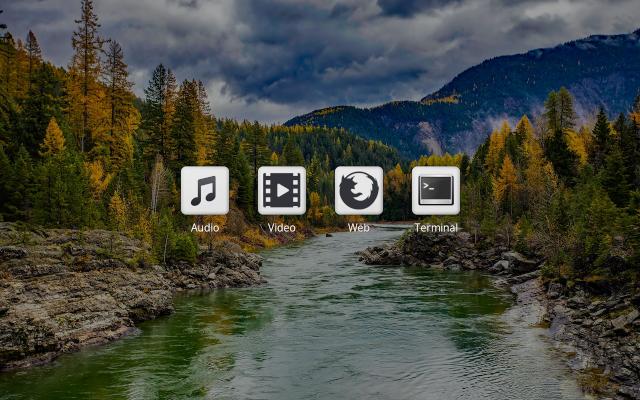
Completing this guide should result in the Chromebase booting to a desktop similar to the screenshot. The wallpaper is randomly selected on each GUI restart.
The main components by default are:
- Alpine Linux
- herbstluftwm tiling window manager
- A customized version of libsgestures for triggering actions from touch gestures
- A customized version of svkbd for on screen keyboard input
- jivelite for control of Logitech Music Server players
- squeezelite headless player for Logitech Music Server
- xlunch app launcher for desktop icons and file selections
- mpv media player
The idea is to have multiple workspaces (tags) with one full screen application running per tag and mapped to an icon on the desktop. For example, pressing the Audio icon selects tag 1 and launches jivelite. Tag 0 displays the desktop icons by default and is selected by a two finger tap on the right hand 1/3 of the screen.
Default gestures are:
- All screens:
- Right hand 1/3 of the screen:
- 2 finger tap: show desktop icons (selects tag 0)
- Right hand 1/3 of the screen:
- Desktop icon screen only (no running applications)
- Left hand 1/3 of the screen:
- 1 finger swipe up: brightness up 10%
- 1 finger swipe down: brightness down 10%
- 3 finger tap: reboot
- 3 finger swipe down: poweroff
- Left hand 1/3 of the screen:
- Video player screen (mpv)
- Left hand 1/3 of the screen:
- 1 finger swipe up: volume up 5
- 1 finger swipe down: volume down 5
- Middle 1/3 of the screen:
- 2 finger tap: play/pause
- Left hand 1/3 of the screen:
- Most screens (disabled by default on the jivelite and mpv screens):
- Right hand 1/3 of the screen:
- 1 finger swipe right: open on screen keyboard (opens automatically with terminal)
- 1 finger swipe left: close on screen keyboard
- Right hand 1/3 of the screen:
The setup script creates a user named “cb” which is the user that automatically logs in and runs the GUI.
The “cb” user belongs to the wheel group and has doas privileges to run commands without being prompted to enter a password.
This is convenient but not a very secure configuration if someone malicious gains access to your device.
Securing the default configuration created by this guide is up to the reader.
All files needed for the steps below can be downloaded from the repo.
Boot from USB and Install Alpine to Internal eMMC
- Download the current boot image file from the repo (eg. aopen-veyron-5.15.59.img.tar.gz)
- Extract the .img file from the tar archive and write to USB stick (use the right device path!)
~$ wget http://www.sodface.com/repo/cb/aopen-veyron/aopen-veyron-5.15.59.img.tar.gz
~$ tar xzvf aopen-veyron-5.15.59.img.tar.gz
~$ sudo dd if=aopen-veyron-5.15.59.img of=/dev/sdb bs=4096
~$ sync
- Boot Chromebase from USB stick (ctrl-u)
- Login as root with no password
- Run
./install-mmc.sh(in root’s home dir) - Reboot
Boot Alpine from Internal eMMC and Set Clock
- Boot Alpine from internal eMMC (ctrl-d)
- Login as root with no password
- Set the clock to the current date and time
# date -s 202209302012
Setup Networking
This guide has had multiple revisions in response to user feedback (thanks Patricia P and ralphy!). Networking in particular can cause problems during setup and during use if you switch back and forth between the wired and wifi interfaces. There are multiple approaches to successfully getting through initial setup and having a reliable configuration for daily use:
- Use the wired interface for setup and daily use
- Use the wifi interface for setup and daily use
- Use the wired interface for setup and wifi for daily use
- Bond the wired and wifi interfaces together to allow seamless switching
I think that covers the majority of use cases, there are probably others.
This guide will cover the first two. Networking can, of course, be reconfigured at any time after intial setup, but I will leave that in the capable hands of the reader.
Wired Ethernet for Setup and Daily Use
- Connect eth0 and get an IP address with dhcp
# ip link set eth0 up
# udhcpc
Wifi for Setup and Daily Use
The kernel options to support the iNet Wireless Daemon (iwd) are configured and the Alpine iwd package is installed by default.
The iwd openrc service is also set to start at boot by default which renames the default device mlan0 to wlan0.
The iwd configuration file /etc/iwd/main.conf is configured so that iwd manages the wlan0 interface, uses the dhcp client built into iwd, and uses openresolv to manage name resolution.
- Connect to Wifi with iwctl
# iwctl station wlan0 connect [your ssid]
Passphrase:
Verify Internet Access
Whether you chose wired or wifi networking, check your interface config and verify internet access before continuing.
Check that you have an IP address on eth0 (wired) or wlan0 (wifi):
# ip a
Verify internet access:
# ping 8.8.8.8
# ping www.google.com
Do not continue without internet access.
If using wifi and your wlan0 IP address looks good but the ping test fails with “Network unreachable”, reboot. After reboot, iwd should automatically reconnect to wifi. Repeat the connectivity checks.
Continue Setup
- Run through setup-alpine, some more notes on answers below, but pay close attention to the network interface question:
Available interfaces are: eth0 wlan0.
Enter '?' for help on bridges, bonding and vlans.
Which one do you want to initialize? (or ? or 'done') [eth0] _
The default answers are in brackets, eg. [eth0], so just pressing enter will result in the default selection being configured.
If you chose to use wired networking, just press enter to accept eth0 (or you can type in eth0 and press enter).
If you chose to use wifi, do NOT enter wlan0 but instead type “done” and press enter.
The remaining network questions (manual config, domain name, nameserver) you should be able to just press enter and accept the defaults.
# setup-alpine
Notes on setup-alpine:
- Most of the answers to the setup-alpine questions are up to you and how you are planning to use the Chromebase
- If you choose to create a user during setup that’s fine, but don’t use “cb” for a user name since that user will be created by the
setup-cb.shscript - Enter “none” when asked about disks to use, we already installed to the eMMC.
- I usually enter “none” for apk cache location to save space on the internal eMMC but it probably doesn’t matter if you choose the default cache location
Just re-run setup-alpine again if you want to change a response.
If re-running, previous responses may now be the defaults.
- Download and run setup-cb.sh
# wget http://www.sodface.com/repo/cb/aopen-veyron/setup-cb.sh
# chmod +x setup-cb.sh
# ./setup-cb.sh 2>&1 | tee setup-cb.log
You will be prompted to set the password for the cb user and then the script should run without errors until you see “Done, please reboot.”
Review the setup-cb.log file for errors if needed.
- Reboot and the Chromebase should boot and automatically log in and display the desktop icons
# reboot
Application notes
- The use of jivelite and squeezelite assume that you have a Logitech Media Server (LMS) on your network
- LMS can be installed on the Chromebase also by
apk add lmsbut extra setup is required and not covered in this guide
- LMS can be installed on the Chromebase also by
- The first time you launch jivelite, select “Grid Skin (1280x800)”
See also: Aopen Chromebase Mini with Alpine Linux, Squeezelite and Jivelite